Beranda
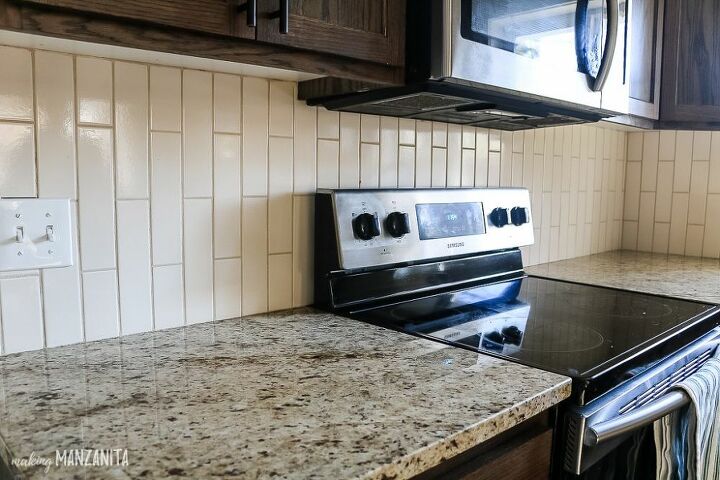
/ How To Install A Subway Tile Backsplash - How To Install A Subway Tile Kitchen Backsplash Young House Love / What better way to add some pop in your laundry room than a glossy white tiled backsplash.
How To Install A Subway Tile Backsplash - How To Install A Subway Tile Kitchen Backsplash Young House Love / What better way to add some pop in your laundry room than a glossy white tiled backsplash.
Insurance Gas/Electricity Loans Mortgage Attorney Lawyer Donate Conference Call Degree Credit Treatment Software Classes Recovery Trading Rehab Hosting Transfer Cord Blood Claim compensation mesothelioma mesothelioma attorney Houston car accident lawyer moreno valley can you sue a doctor for wrong diagnosis doctorate in security top online doctoral programs in business educational leadership doctoral programs online car accident doctor atlanta car accident doctor atlanta accident attorney rancho Cucamonga truck accident attorney san Antonio ONLINE BUSINESS DEGREE PROGRAMS ACCREDITED online accredited psychology degree masters degree in human resources online public administration masters degree online bitcoin merchant account bitcoin merchant services compare car insurance auto insurance troy mi seo explanation digital marketing degree floridaseo company fitness showrooms stamfordct how to work more efficiently seowordpress tips meaning of seo what is an seo what does an seo do what seo stands for best seotips google seo advice seo steps, The secure cloud-based platform for smart service delivery. Safelink is used by legal, professional and financial services to protect sensitive information, accelerate business processes and increase productivity. Use Safelink to collaborate securely with clients, colleagues and external parties. Safelink has a menu of workspace types with advanced features for dispute resolution, running deals and customised client portal creation. All data is encrypted (at rest and in transit and you retain your own encryption keys. Our titan security framework ensures your data is secure and you even have the option to choose your own data location from Channel Islands, London (UK), Dublin (EU), Australia.
How To Install A Subway Tile Backsplash - How To Install A Subway Tile Kitchen Backsplash Young House Love / What better way to add some pop in your laundry room than a glossy white tiled backsplash.. 10 tips for installing subway tile. Depending on the tile that is to be installed, and where it will be installed, it is sometimes approp. I love subway tile because it seems to be timeless. This is a complete guide with detailed installation information for the begi. Installing a penny tile backsplash in our last kitchen (getting started, cutting tiles, grouting, removing haze) removing an old shower tile border and installing a new one;
Move appliances out of the way and cover the surrounding area to protect adjacent surfaces. Too much of a good thing doesn't apply when it comes to subway tile in the bathroom. The directions said to pull down the film from the backside and place the piece on the wall, pressing the top into place and then pulling the film off to the bottom and that definitely worked well. So first, let me share all the products you will need to complete the tile installation. You can read week 1 and week 2.
How To Install A Tile Backsplash How Tos Diy from diy.sndimg.com 1) put your tile and tile adhesive in the room you are going to be installing and maintain the temperature at 70 degrees or more for a full 24 hours before you start this how to install a subway tile backsplash. Continue that pattern and you'll end up with the coveted and classic subway pattern. How to install subway tile in your kitchen with tips and tricks for a flawless installation. I love subway tile because it seems to be timeless. If you are following along this is week 3 of the $100 room challenge. Put your tile and tile adhesive in the room you are going to be installing and maintain the temperature at 70 degrees or more for a full 24 hours before you start this how to install a subway tile backsplash. How to install a simple subway tile kitchen backsplash. Measure halfway down your tile and mark with a pencil.
I love subway tile because it seems to be timeless.
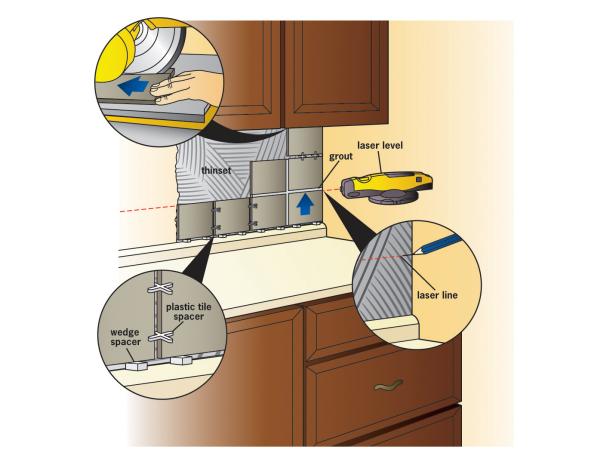
What better way to add some pop in your laundry room than a glossy white tiled backsplash. Multiply these numbers by each other. This will give you the total area you want to tile. If you're following the traditional subway tile layout, this means that you'll start with a half tile from the outer edge. Installing a subway tile backsplash: To apply your tile in a subway pattern, just start with a full piece of tile on your first row, then cut a piece of tile in half to start your second row. In this video i show the entire process of installing a subway tile backsplash. In this video i show you guys how to install a backsplash tile in your kitchen. A straightedge or level can help you keep the tile even. Installing large stone tile in an outdoor area; White subway tile backsplash don't: This helps everything to acclimate and produce a better result. How to install subway tile in your kitchen with tips and tricks for a flawless installation.
I cut the first few tiles in half using a wet tile saw. How to install a simple subway tile kitchen backsplash. If you're following the traditional subway tile layout, this means that you'll start with a half tile from the outer edge. You can use either tile adhesive (glue) or thinset mortar to install your backsplash tile. How to install subway tile in your kitchen with tips and tricks for a flawless installation.
How To Install Subway Tile Backsplash Diy Hometalk from cdn-fastly.hometalk.com Put your tile and tile adhesive in the room you are going to be installing and maintain the temperature at 70 degrees or more for a full 24 hours before you start this how to install a subway tile backsplash. Move appliances out of the way and cover the surrounding area to protect adjacent surfaces. Work your way outward and upward from there. Doing a kitchen remodel is a great way to make your home look n. I love subway tile because it seems to be timeless. Subway tile can be anywhere from extremely simple to extremely difficult to install, depending on the material you've chosen, the layout of the area and the pattern of the tile. Establish the perimeter of the area you'll cover, and apply painter's tape to the walls to mark the edges. Use a tape measure and measure the width and length of the space you want to cover with subway tiles.
As a tiling newbie, i didn't know that ledgers were used in tiling.
How to prep the tile surface, cut the tile, and we discuss all the materials. Start by applying it from the bottom up, and the top down, and then spread it out horizontally with the notched end of your trowel at a 45 degree angle. Line up your halfway mark with the middle of a manual tile snapper, shiny side up. It was a little time consuming but i learned a ton. A straightedge or level can help you keep the tile even. The minimalist pattern gives workspaces an unexpectedly progressive edge and an orderly outlook that perfectly suits transitional and modern designs. Your starting point depends on the most viewable area of the wall. It works in a lot of different decors and styles and since i started looking around it seems to have spanned over decades. I love subway tile because it seems to be timeless. This is a complete guide with detailed installation information for the begi. If you're following the traditional subway tile layout, this means that you'll start with a half tile from the outer edge. In this video i show the entire process of installing a subway tile backsplash. Work your way outward and upward from there.
Afterwards, add 10% to the total to cover potential waste. Too much of a good thing doesn't apply when it comes to subway tile in the bathroom. Work your way outward and upward from there. If you still have any mastic or mortar still on the wall, you need to go back and work more on the tile removal process. Measure halfway down your tile and mark with a pencil.
8 Diy Tile Kitchen Backsplashes That Are Worth Installing Shelterness from i.shelterness.com Work your way outward and upward from there. Use a daring finish to create interest. To apply your tile in a subway pattern, just start with a full piece of tile on your first row, then cut a piece of tile in half to start your second row. Continue that pattern and you'll end up with the coveted and classic subway pattern. Your starting point depends on the most viewable area of the wall. Multiply these numbers by each other. Installing backsplash with thinset mortar the thinset mortar comes in a powder form in a bag. 1) put your tile and tile adhesive in the room you are going to be installing and maintain the temperature at 70 degrees or more for a full 24 hours before you start this how to install a subway tile backsplash.
In this video i show you guys how to install a backsplash tile in your kitchen.
In this video i show you guys how to install a backsplash tile in your kitchen. Depending on the tile that is to be installed, and where it will be installed, it is sometimes approp. Start by applying it from the bottom up, and the top down, and then spread it out horizontally with the notched end of your trowel at a 45 degree angle. You can read week 1 and week 2. Use a tape measure and measure the width and length of the space you want to cover with subway tiles. However, looking at the different alternatives, and realizing how expensive it was going to be, we started coming up with other ideas. The most effective method of laying a subway tile backsplash in the corners is to start with one side and work up the entire height of that side. I love subway tile because it seems to be timeless. Measure halfway down your tile and mark with a pencil. Afterwards, add 10% to the total to cover potential waste. The backside has a clear film that pulls off for applying to the walls. If you still have any mastic or mortar still on the wall, you need to go back and work more on the tile removal process. How to install subway tile in your kitchen with tips and tricks for a flawless installation.